Smart Card Guy

Smart Card / Java Card, Cyber Security, IoT Device Security, Root of Trust, 標準化等

Java CardからのAPDU処理 - APDU Class

Java CardでのAPDU処理

  • javacard.framework.APDU
  • Card上のAppletはCADと直接やり取りはしない。必ず、JCRE(Java Card Runtime Env)を経由。
  • JCREがAPDU object (APDU buffer - internal byte array)を作成

C-APDU, R-APDUおさらい

C-APDU

f:id:blog-guy:20180630102534p:plain

R-APDU

f:id:blog-guy:20180630102552p:plain

C-APDUの解析

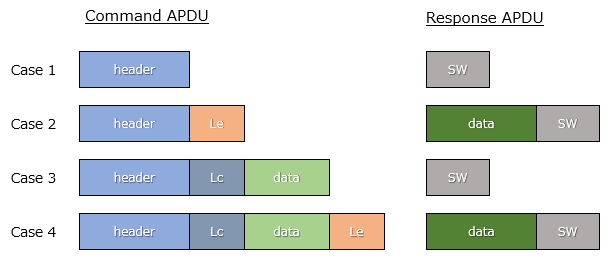
  • appletのprocess methodが呼ばれる際、APDU bufferには最初の5バイトが利用可能
  • 最初の4 byte : APDU Header [CLS, INS, P1, P2]
  • 5 byte目 : length field [P3]

f:id:blog-guy:20190222171540p:plain

Case 1 - No command data, no reponse data

P3 : 0

Case 2 - No command data, send reponse data

P3 : Le field

Case 3 - Receive command data, no reponse data

P3 : Lc field

Case 4 - Receive command data, send reponse data

Case 3とCase 2を合わせたCase

Code Sample (sample HelloWorld)

   public void process(APDU apdu) {
        byte buffer[] = apdu.getBuffer();

        // check SELECT APDU command
        if ((buffer[ISO7816.OFFSET_CLA] == 0) &&
                (buffer[ISO7816.OFFSET_INS] == (byte) (0xA4))) {
            return;
        }

        short bytesRead = apdu.setIncomingAndReceive();
        short echoOffset = (short) 0;

        while (bytesRead > 0) {
            Util.arrayCopyNonAtomic(buffer, ISO7816.OFFSET_CDATA, echoBytes, echoOffset, bytesRead);
            echoOffset += bytesRead;
            bytesRead = apdu.receiveBytes(ISO7816.OFFSET_CDATA);
        }

        apdu.setOutgoing();
        apdu.setOutgoingLength((short) (echoOffset + 5));

        // echo header
        apdu.sendBytes((short) 0, (short) 5);
        // echo data
        apdu.sendBytesLong(echoBytes, (short) 0, echoOffset);
    }

Link

Java Card開発 - 環境構築 (Java Card 3.1)

必要ドキュメント

環境の用意

Windowsでサンプルを動かす場合、以下の3つだけ!

JDK 8

http://www.oracle.com/technetwork/java/javase/downloads/index.html

Java Card Development Kit Simulator / Java Card Development Kit Tools

https://www.oracle.com/technetwork/java/embedded/javacard/overview/index.html

  • 注意 : 3.1からJava Card Dev Kit SimulatorとDev Kit Toolsというものがあるが、SimulatorはToolsを含むので、Simulatorをインストールした場合、Toolsは不要

Eclipse - Windows Eclipse IDE (Eclipse Neon, Oxygen, or Photon)

https://www.eclipse.org/downloads/packages/release

今回の環境

OS : Windows 10 64 bit

インストール (2019/02時点)

JDK 8 (JDK 8u201 64 bit)

  • Install Folder : D:\Dev\Java\jdk1.8.0_201
  • JAVA_HOME環境変数も設定しておくこと。 f:id:blog-guy:20190221142453p:plain

Eclipse (Photon 64 bit)

  • Eclipse Photon - R Packages - Eclipse IDE for Java Developersを選択
  • zip (2019/02時点 - eclipse-java-photon-R-win32-x86_64.zip) を解凍し、下記の場所へ配置
  • Install Folder : D:\Dev\eclipse\java-photon

Java Card Development Kit Simulator (3.1)

  • msi (2019/02時点 - java_card_simulator-3_1_0-win-bin-do-b_74-17_jan_2019.msi)をクリックし、インストール
  • Install Folder : D:\Dev\Java Card\Java Card Development Kit Simulator 3.1.0\
  • このフォルダーがJC_HOME_SIMULATOR f:id:blog-guy:20190221143735p:plain

Java Card Development Kit Tools (3.1)

  • ToolsはSimulatorのサブセット。Simulatorをインストールした場合は、不要。
  • Toolsフォルダーは下記のとおり。Simulatorからdocs, eclipse-plugin, samplesフォルダーがないだけ。

f:id:blog-guy:20190221151623p:plain

Eclipse Plug-Inインストール

  • Eclipse Menu => Help => Install New Software => Add
  • Add Repositoryポップアップ画面から、Archiveを押下し、JC_HOME_SIMULATOR\eclipse-plugin\jcdk-repository_yyyymmddxxxx.zipを追加
  • NameはJava Card SDK

f:id:blog-guy:20190221144247p:plain

Sample_Platform, Sample_Device登録

  • EclipseのWindows => Preferences => Java Card Platforms
  • デフォルトで、下記のようにSample_Platform, Sample_Deviceが既に登録済みなので、確認だけ。

f:id:blog-guy:20190221144706p:plain

サンプル実行

Sample Projectsのインポート

f:id:blog-guy:20190221145042p:plain

正しく取り込んだら下記のように見えるはず。左下の部分がJava Card View。

f:id:blog-guy:20190221150918p:plain

もしJava Card Viewが見えない場合は、Window => Show View => OthersからJava Card Viewを指定

f:id:blog-guy:20190221150655p:plain

事例 - STMicro - ST54J : NFC Controller + Secure Element + eSIM

ST54J

ST54J : a system-on-chip (SoC) containing an NFC (Near-Field Communication) controller, Secure Element, and eSIM

Secure microcontroller

  • Arm® SecurCore® SC300™ 32-bit RISC core cadenced at 100 MHz
  • 2.0 Mbytes of Flash memory
  • 2 Kbytes of memory cache
  • 64 Kbytes of user RAM
  • Power saving Standby and Hibernate states

対応OS / Middleware

  • Supports state of the art secure element operating systems:
    • Java Card™ 3.0.5
    • GlobalPlatform® 2.3 with Amdts
    • EMVCo™ certification
  • Security-certified according to CC EAL5+
  • Hardware security-enhanced DES & AES accelerators
  • MIFARE® Classic cryptography hardware accelerator
  • NESCRYPT coprocessor for public key cryptography algorithm

Link

www.st.com

www.st.com

iPhone XS / XS Max Teardown - eSIM

Link

eSIM

ST Microelectronics ST33G1M2
  • 32bit ARM SC300 secure core with SWP for Secure element or SIM-SWP
  • ST Page - ST33G1M2
  • Data Brief
  • Major applications
    • Mobile communications (GSM, 3G and CDMA)
    • NFC mobile transactions
    • Java Card™ applications
    • Multimedia
ST Microelectronics - SIM & eSIM
arm SC300